Windows XP : Cleaning up unwanted startup programs
Many freeware and commercial software programs have a habit of setting themselves up to run automatically upon Windows startup. This can contribute to the gradual decline in startup speed that most Windows XP systems (and windows PCs in general) experience. Also, having programs that you only use selectively, or not at all, load automatically is a waste of system resources that could be better used for other things.
To top it off, many internet nasties such as spyware programs, viruses and Trojan horses will install themselves into one of the automatic start locations on your system in order to make sure that they are run on startup. So the point is, take a look at what is currently running every time you load your PC, and disable what you don't need or can't identify.
To do this: The first place you should go is 'start\programs\startup' which is a directory Windows XP uses to launch application shortcuts on boot-up.
If you remove the shortcuts from this directory, the applications will not load on startup. This directory can also be a repository for various badness such as spyware and virus software, so if there are files here which are not shortcuts and you don't recognize them, you may wish to consider removing them anyways, as Windows will not place critical files in this directory.
The next location for removing unnecessary startup files is the handy MSCONFIG utility that has been resurrected from the graveyard of Windows 9x especially for XP.
Go to 'start\run' and type 'msconfig' to access the utility.
The 'startup' tab in MSCONFIG provides access to several other applications that are started at boot up and are running in the background. By examining their Filenames and directories, you should be able to get a feeling for what is necessary and what is not. Be aware than several viruses and worms have a habit of disguising themselves with authoritative sounding Windows system file names.
The other method for removing these programs is through the programs themselves, as many applications, for example MSN messenger, contain the option to remove the software from startup.
Wednesday, August 22, 2007
Cleaning up unwanted startup programs
Tips : For More Efficient Google Searches
1. Either/or. Google normally searches for pages that contain all the words you type in the search box, but if you want pages that have one term or another (or both), use the OR operator — or use the “” symbol (pipe symbol) to save you a keystroke. [dumb little man]
2. Quotes. If you want to search for an exact phrase, use quotes. [”dumb little man”] will only find that exact phrase. [dumb “little man”] will find pages that contain the word dumb and the exact phrase “little man”.
3. Not. If you don’t want a term or phrase, use the “-” symbol. [-dumb little man] will return pages that contain “little” and “man” but that don’t contain “dumb”.
4. Similar terms. Use the “~” symbol to return similar terms. [~dumb little man -dumb] will get you pages that contain “funny little man” and “stupid little man” but not “dumb little man”.
5. Wildcard. The “*” symbol is a wildcard. This is useful if you’re trying to find the lyrics to a song, but can’t remember the exact lyrics. [can’t * me love lyrics] will return the Beatles song you’re looking for. It’s also useful for finding stuff only in certain domains, such as educational information: [”dumb little man” research *.edu].
6. Advanced search. If you can’t remember any of these operators, you can always use Google’s advanced search.
7. Definitions. Use the “define:” operator to get a quick definition. [define:dumb] will give you a whole host of definitions from different sources, with links.
8. Calculator. One of the handiest uses of Google, type in a quick calculation in the search box and get an answer. It’s faster than calling up your computer’s calculator in most cases. Use the +, -, *, / symbols and parentheses to do a simple equation.
9. Numrange. This little-known feature searches for a range of numbers. For example, [”best books 2002..2007] will return lists of best books for each of the years from 2002 to 2007 (note the two periods between the two numbers).
10. Site-specific. Use the “site:” operator to search only within a certain website. [site:dumblittleman.com leo] will search for the term “leo” only within this blog.
11. Backlinks. The “link:” operator will find pages that link to a specific URL. You can use this not only for a main URL but even to a specific page. Not all links to an URL are listed, however.
12. Vertical search. Instead of searching for a term across all pages on the web, search within a specialized field. Google has a number of specific searches, allowing you to search within blogs, news, books, and much more:
* Blog Search
* Book Search
* Scholar
* Catalogs
* Code Search
* Directory
* Finance
* Images
* Local/Maps
* News
* Patent Search
* Product Search
* Video
13. Movies. Use the “movie:” operator to search for a movie title along with either a zip code or U.S. city and state to get a list of movie theaters in the area and show times.
14. Music. The “music:” operator returns content related to music only.
15. Unit converter. Use Google for a quick conversion, from yards to meters for example, or different currency: [12 meters in yards]
16. Types of numbers: Google algorithms can recognize patterns in numbers you enter, so you can search for:
* Telephone area codes
* Vehicle ID number (US only)
* Federal Communications Commission (FCC) equipment numbers (US only)
* UPC codes
* Federal Aviation Administration (FAA) airplane registration number (US only)
* Patent numbers (US only)
* Even stock quotes (using the stock symbol) or a weather forecast regarding the next five days
17. File types. If you just want to search for .PDF files, or Word documents, or Excel spreadsheets, for example, use the “filetype:” operator.
18. Location of term. By default, Google searches for your term throughout a web page. But if you just want it to search certain locations, you can use operators such as “inurl:”, “intitle:”, “intext:”, and “inanchor:”. Those search for a term only within the URL, the title, the body text, and the anchor text (the text used to describe a link).
19. Cached pages. Looking for a version of a page the Google stores on its own servers? This can help with outdated or update pages. Use the “cached:” operator.
20. Answer to life, the universe, and everything. Search for that phrase, in lower case, and Google will give you the answer.
Windows XP File System NTFS - Faster, Secure, Stable : Microsoft.com
To NTFS or not to NTFS—that is the question. But unlike the deeper questions of life, this one isn't really all that hard to answer. For most users running Windows XP, NTFS is the obvious choice. It's more powerful and offers security advantages not found in the other file systems. But let's go over the differences among the files systems so we're all clear about the choice. There are essentially three different file systems available in Windows XP: FAT16, short for File Allocation Table, FAT32, and NTFS, short for NT File System.
FAT16
The FAT16 file system was introduced way back with MS–DOS in 1981, and it's showing its age. It was designed originally to handle files on a floppy drive, and has had minor modifications over the years so it can handle hard disks, and even file names longer than the original limitation of 8.3 characters, but it's still the lowest common denominator. The biggest advantage of FAT16 is that it is compatible across a wide variety of operating systems, including Windows 95/98/Me, OS/2, Linux, and some versions of UNIX. The biggest problem of FAT16 is that it has a fixed maximum number of clusters per partition, so as hard disks get bigger and bigger, the size of each cluster has to get larger. In a 2–GB partition, each cluster is 32 kilobytes, meaning that even the smallest file on the partition will take up 32 KB of space. FAT16 also doesn't support compression, encryption, or advanced security using access control lists.
FAT32
The FAT32 file system, originally introduced in Windows 95 Service Pack 2, is really just an extension of the original FAT16 file system that provides for a much larger number of clusters per partition. As such, it greatly improves the overall disk utilization when compared to a FAT16 file system. However, FAT32 shares all of the other limitations of FAT16, and adds an important additional limitation—many operating systems that can recognize FAT16 will not work with FAT32—most notably Windows NT, but also Linux and UNIX as well. Now this isn't a problem if you're running FAT32 on a Windows XP computer and sharing your drive out to other computers on your network—they don't need to know (and generally don't really care) what your underlying file system is.
The Advantages of NTFS
The NTFS file system, introduced with first version of Windows NT, is a completely different file system from FAT. It provides for greatly increased security, file–by–file compression, quotas, and even encryption. It is the default file system for new installations of Windows XP, and if you're doing an upgrade from a previous version of Windows, you'll be asked if you want to convert your existing file systems to NTFS. Don't worry. If you've already upgraded to Windows XP and didn't do the conversion then, it's not a problem. You can convert FAT16 or FAT32 volumes to NTFS at any point. Just remember that you can't easily go back to FAT or FAT32 (without reformatting the drive or partition), not that I think you'll want to.
The NTFS file system is generally not compatible with other operating systems installed on the same computer, nor is it available when you've booted a computer from a floppy disk. For this reason, many system administrators, myself included, used to recommend that users format at least a small partition at the beginning of their main hard disk as FAT. This partition provided a place to store emergency recovery tools or special drivers needed for reinstallation, and was a mechanism for digging yourself out of the hole you'd just dug into. But with the enhanced recovery abilities built into Windows XP (more on that in a future column), I don't think it's necessary or desirable to create that initial FAT partition.
When to Use FAT or FAT32
If you're running more than one operating system on a single computer (see my earlier column Multibooting Made Easy), you will definitely need to format some of your volumes as FAT. Any programs or data that need to be accessed by more than one operating system on that computer should be stored on a FAT16 or possibly FAT32 volume. But keep in mind that you have no security for data on a FAT16 or FAT32 volume—any one with access to the computer can read, change, or even delete any file that is stored on a FAT16 or FAT32 partition. In many cases, this is even possible over a network. So do not store sensitive files on drives or partitions formatted with FAT file systems.

Source And Credit Microsoft.com
About RSS Feed
Many of us Dont know about RSS Feed. It is very useful and helpful key of SEO. Please read below to know more about RSS Feed.
RSS is a family of web feed formats used to publish frequently updated content such as blog entries, news headlines or podcasts. An RSS document, which is called a "feed," "web feed," or "channel," contains either a summary of content from an associated web site or the full text. RSS makes it possible for people to keep up with their favorite web sites in an automated manner that's easier than checking them manually.
RSS content can be read using software called a "feed reader" or an "aggregator." The user subscribes to a feed by entering the feed's link into the reader or by clicking an RSS icon in a browser that initiates the subscription process. The reader checks the user's subscribed feeds regularly for new content, downloading any updates that it finds.
The initials "RSS" are used to refer to the following formats:
* Really Simple Syndication (RSS 2.0)
* RDF Site Summary (RSS 1.0 and RSS 0.90)
* Rich Site Summary (RSS 0.91)
RSS formats are specified using XML, a generic specification for the creation of data
Monday, August 20, 2007
Tips : To Setup a Virtual Private Network
Steps
Setting up a VPN in Windows is a two step process.
1. Set up one computer to share files (server).
2. Set up another computer to access them (client).
Begin by setting up the server:
1. Open Internet Explorer and go to www.whatismyip.com. Write down the IP address. You will need it to configure the client.
2. Click the Start button and click Run.
3. Type control and hit Enter.
4. Click Network and Internet Connections.
5. Click Network Connections.
6. Click Create a New Connection, which is the first option on the left toolbar.
7. The New Connection Wizard will open. Click Next.
8. Choose Set up an advanced connection, the last element on the list. Click Next.
9. Choose Accept incoming connections. Click Next.
10. You will see the Devices for Incoming Connections screen. Do not select anything on this screen. Click Next.
11. Select Allow virtual private connections. Click Next.
12. Select to whom you want to give access. Click Next. If a user is not listed, you will have to add an account. See “Related Wikihows” for more information.
13. Do not change anything on the Networking Software screen. Click Next.
14. That’s it! Your computer is now set up to allow for VPNs. Click Finish to complete the wizard.
Now proceed to connect the client:
1. Click the Start button and click Run.
2. Type control and hit Enter.
3. Click Network and Internet Connections.
4. Click Network Connections.
5. Click Create a New Connection, which is the first option on the left toolbar.
6. The New Connection Wizard will open. Click Next.
7. Select Connect to the network at my workplace and click Next.
8. Select Virtual Private Network connection and click Next.
9. Type the name of your network in the blank box. Click Next.
10. Enter the IP address you wrote down earlier and click Next.
11. Select Add a shortcut to this connection to my desktop and click Finish.
Tips
* Both computers must be connected to the internet.
* The user name and password must be entered exactly as you saved them.
* The IP address must be written exactly as listed on the screen.
* If the VPN doesn’t work, turn off your firewall.
Warnings
* Do not give access to the “guest” account. It does not require a password, allowing anyone to access the VPN.
Tips : To Fix Errors on Page After Updating IE7
Steps
1. Run the most recent version of javascript.
2. Adjust settings in the browser.
3. Click on tools in IE7.
4. Open Internet Options and click on security tab, then custom level.
5. Shut off the internet security controls while doing the security settings.
* .NET Framework: enable all settings
* ActiveX controls and plug-ins:
* Previously used ActiveX controls: disable
* Allow scriptlets, automatic prompting, Binary and script behaviors, Display video and animation on webpage: enable
* Download signed ActiveX controls, download unsigned activeX controls, initialize and script activeX controls: Prompt
* Run ActiveX controls and plug-ins (again), script ActiveX controls marked safe for scripting: Enable
* Downloads: Automatic prompting for file downloads: Disable
* Downloads: File download, font download: Enable
* Enable .NET framework setup: Enable
* Microsoft VM: Medium safety
* Misc: access data sources across domains: Disable
* Allow META refresh: Enable
* Allow scripting of internet explorer web-browser control, allow script initiated windows without size or position: Disable
* Allow webpages to use restricted protocols: Prompt
* Allow websites to open windows without address or status bars: Disable
* Display mixed content: Prompt
* Don't prompt for client certificate selection: Disable
* Drag and drop or copy and paste files, include local directory path: Enable
* Install desktop items, launching applications and unsafe files, launching programs and files in iframe: Prompt
* Navigate subframes across different domains: Disable
* Open files based on content: enable
* Software channel permissions: Medium
* Submit nonencrypted data: Enable
* Use phishing filter, use pop-up blocker: Disable
* Userdata persistence, websites in less privileged content zone, Scripting: active scripting: Enable
* Allow programtic clipboard access: Prompt
* Allow status bar updates via script, allow websites to prompt for information: Disable
* Scripting of java applets: Enable
* Logon: Auto logon for intranet zone
6. After settings are adjusted, click OK. You will get IE WARNING message: Click Yes
7. Click on Advanced folder and go to bottom.
8. Click on Empty Internet Files.
* Disable Phishing filter: Click Apply
* For Tab settings: Click on General
9. Click on Settings under tabs (how webpages...).
10. Check off circles: Always open pop-ups in new tab and a new tab in the current window.
11. Click OK.
12. Close IE7 browser.
13. Right click on IE7 icon on desktop and click Start without add-ons. You will get warning: ignore
14. Close IE7 and repeat last step.
Tips : To Configure DHCP in Your PC
Dynamic Host Configuration Protocol (DHCP) is the configuration of your Internet Protocol (IP) address, subnet mask, DNS servers, domain name suffix and about 200 other possible options to let your computer communicate with a network automatically via a server or router. It sounds complicated, but once set up, it can make connecting to a network much easier.
Steps
1. Log into Windows XP with administrator rights. This makes setting up the network for you, and other users, easier as you can make all the necessary changes to settings.
2. Look for the Network Neighborhood or My Network Places icon in your desktop. If it is not there, try your Start Menu.
3. Right-click the Network Neighborhood/My Network Places icon. A drop-down menu will appear.
4. Choose the "Properties" option, generally found at the bottom of the menu.
5. Look for an icon named "Local Area Connection". The icon looks like a pair of computer connected by a link. Double-click this icon.
6. Click the "General" tab, if it is not already selected. You will see a list of protocols to choose form.
7. Scroll down and choose Internet Protocol (TCP/IP), and then click the button that is labeled "Properties".
8. Again, click the "General" tab, it it is not alreay selected. You will see two choices:
1. "Obtain an IP address Automatically"
2. "Use the following IP address..."
9. Choose option 1.
10. You have effectively configured DHCP for your PC. When your computer obtains the IP address, it will also obtain DNS server information automatically. This is provided by your dhcp server.
Tips
* Make sure your NIC (Network Card)is working properly.
* Make sure you are connected directly to a router, switch or hub.
* Make sure the Link light is on. (small green light where the cable plugs into the computer)
* If you are connected to a LAN, make sure that you have a router that will give addresses away, since the address will be obtained by the PC from the router.
* If you have a Server on the LAN such as Windows 2000 or 2003, make sure the server is configured DHCP enabled as well.
Tips : To Connect Two Computers
Steps
1. Connect the two computers together either with a Crossover cable or a Hub/Switch to the ethernet card in your computer.
2. Set the IP address on both computers. Goto Start > Control Panel > Network Connections (choose switch to classic view if you cannot see network connections)
3. Look for your Local Area Connection ethernet adapter, right-click and choose properties.
4. Select Internet Protocol TCP/IP and choose properties.
5. Setup the IP as 192.168.1.1 and the subnet mask of 255.255.255.0 on the first computer and 192.168.1.2 on the second with the same subnet mask.
6. Choose OK then OK/close again.
Tips
* To share your files, right click on any folder and choose Sharing to make them shared.
* You can also do this with your printers to be able to print from one computer while the printer is connected to the other.
Things You'll Need
* A Crossover cable. This a Cat5 Ethernet Cable that the wires have been switched around to allow two computer only to talk to each other
* OR, you can purchase a switch/hub with two Standard "Straight-Through" Ethernet Cables
* Check to see if your computer has an Ethernet Adapter in the back of the computer. Most new computers have this. You can tell by the documentation from the computer or by looking at the back of the computer. It looks like a phone jack, but larger.
This Will Help you to share files and folders, printers, play network games, Etc
Tips : To Install RAM
These instructions will assist you in installing memory (RAM) into your computer.
Steps
1. Find out what type of RAM is required for your computer.
2. Find out how much of that type of RAM your computer can take.
3. Purchase RAM online; it's much cheaper.
4. Open your computer case (this may require a screw driver; usually a Phillips-Head.)
5. Once you have the case open, you need to locate the RAM slots on your motherboard. Most RAM slots are located on the top of the motherboard, on the right-hand side. You should see something in the computer that is similar to what you bought at the store.
6. Push the clamps OPEN to release the memory (if there is RAM already in there, which there may or may not be, depending on whether you're building a computer or altering an existing one). Remove old memory.
7. Look at the new memory and survey the motherboard memory slots. They should have a notch in each memory slot.
8. Line the notch on the motherboard up with the notch on the new memory.
9. Press gently but firmly until claps close completely. Once you have done this, the memory should be installed correctly.
10. Turn on the computer.
11. Once you have successfully booted the system, turn the machine off again and put the side panel back on the computer.
12. VOILA! You have just installed new RAM.
Tips
* If you are getting a beep when you turn on the computer, you have either installed an incorrect memory type, or you have installed the memory incorrectly. If this is a computer that you purchased at a store, you should contact the store or the manufacturer of the computer to find out what the beep code means.
* If you hear anything other than a single beep lasting one second, check your motherboards' documentation for an explanation of beep codes. Beep codes are a warning system when one or more components fails the POST (Power On Self Test), and is usually due to malfunctioning or incompatible hardware.
* If you are adding more RAM (not replacing), make sure there are enough RAM slots. Often you need to buy the exact same RAM as you currently have. Also, having a pair of 512MB is often cheaper than replacing a 512MB with a 1024MB.
* A good website to use is the crucial memory website http://www.crucial.com/ as they have a memory advisor tool which tells you how much and what type of ram your computer takes . you can also buy memory from here
Warnings
* These instructions are for Desktop computers, not Laptops.
* Make sure to discharge any possible static buildup before touching RAM; it is extremely sensitive to ESD (Electro-Static Discharge). Do this by touching something metal before touching your computer
Tips : To assign a Static IP Address To Your Network
To assign a Static IP Address to your network connection follow these steps:
1. Open Network Connections
2. Right click the connection you wish to assign a Static Address to and choose Properties.
3. In the Properties box that comes up select "Internet Protocol TCP/IP" and click the Properties button beneath.
4. In Internet Protocol TCP/IP Properties place a dot in "Use the following IP Address".
5. Enter the IP address you wish to use and OK the change. Click OK on Local Area Connection Properties.
6. Reboot
Tips : Allow more than 2 simultaneous downloads in IE 6
This is to increase the the number of max downloads to 10.
1. Start Registry Editor (Regedt32.exe).
2. Locate the following key in the registry:
HKEY_CURRENT_USER\Software\Microsoft\Windows\CurrentVersion\Internet Settings
3. On the Edit menu, click Add Value (a dword) , and then add the following registry values:
"MaxConnectionsPer1_0Server"=Dword:0000000a
"MaxConnectionsPerServer"=Dword:0000000a
4. Quit Registry Editor.
Tips : To Make Menus Load Faster
Go to Start >>Run
Type 'Regedit' then click 'Ok'
Find "HKEY_CURRENT_USER\Control Panel\Desktop\"
Select "MenuShowDelay"
Right click and select "Modify'
Reduce the number to around "100"
This is the delay time before a menu is opened. You can set it to "0" but it can make windows really hard to use as menus will open if you just look at them - well move your mouse over them anyway.
Tips: To Change Internet Explorer Title
How to change the Internet Explorer tiltle?
1. start ->run-> gpedit.msc
2. choose User Configuration, Windows Settings, Internet Explorer Maintainance, Browser User Interface, and doubleclick Browser Title.
3. Activate Customize Title Bars, and type something in there. Doesn't matter what. Let's type: QWERTY. Click Okay.
4. Fire up Reg editor. (start, run, regedit)
5. goto HKEY_CURRENT_USER\Software\Microsoft\Internet Explorer\Main.
6. Look for the key: Window Title. There you'll find the value: Microsoft Internet Explorer provided bt QWERTY.
7. Change this key to anythig you like and exit regedit.
8. Fire up IE and look at the titlebar!
suppl:
WinXP security: If you don't do steps 1 to 3, you won't find the Window Title key!
Tips: To Change Browser Toolbar Background
Change Browser Toolbar Background
This tweak Customize the apperance of the Internet Explorer Toolbar
1. Click Start > Run > Type gpedit.msc
2. Click User Configuration > Windows Setting > Internet Explorer Maintenance > Browser User Interface
3. Double click on Browser Toolbar Customization
4. Click on Customize Toolbar Background Bitmap
5. Browse for the new Background
Note: Because you can customize your browser toolbar there isn't a specific size which
you need to make this tweak work. Play around with the size until you get it right.
The Width of your toolbar with be the width of your resolution. 1024 will be your width
if your resolution is 1024x768.
Now you changed the Toolbar Background of your browser and you sure see what you
wrote when you open a New Widow.
Enabling USB 2.0 Support For INTEL Boards
Desktop Boards
Enabling USB 2.0 Support
The Intel® Desktop Boards listed below are enabled to support USB 2.0 peripherals. The operating system must support USB 2.0 in order to achieve USB 2.0 performance. If your operating system does not support USB 2.0, your USB 2.0 peripheral will only operate at USB 1.1 (12Mbit) speeds.
USB 2.0 Supported Operating Systems
Microsoft* Windows* XP (all editions)
Microsoft* Windows* 2000 (be sure to have latest Service Pack installed)
Microsoft Windows 98SE
Microsoft Windows Me
To Enable USB 2.0:
Reboot (or power on) system.
Press "F2" during POST (Power-on Self Test) to enter system BIOS setup program.
Select "ADVANCED" menu using arrow (left and right) keys.
Select "USB Configuration" and press
Enable "High-speed USB".
Press "F10" to Save & Exit BIOS setup program. ( Hi-Speed USB 2.0 controllers are now enabled and your operating system should detect New Hardware during the next normal boot cycle.
Cancel "New Hardware Found".
For additional BIOS Setup program configuration information, be sure to refer to the Technical Product Specification for your Intel Desktop Board.
If you do not have an operating system that supports USB 2.0, the recommendation is to disable the feature in the System BIOS Setup program.
Tips : Remove "unremovable" Desktop Icons
Please do the Below Step carefully as it is very dangerious to mess around in. Please Note there is no Edit>Undo. If you make a mistake it could mean you'll be reinstalling your OS!
Remove "unremovable" Desktop Icons
1. Run Regedit by going to Start>Run and typing "Regedit"
2. Go to HKEY_LOCAL_MACHINE\SOFTWARE\Mcft\Windows\CurrentVersion\Explorer\Desktop\NameSpace
For some reason the word M i c r o s o f t is shortened to Mcft
3. Here you will see a list of various icons. They are not listed by name but by CLSID.
4. To remove an icon from your desktop, simply delete the key and hit F5 to refresh your desktop.
{645FF040-5081-101B-9F08-00AA002F954E} - Recycle Bin.
{20D04FE0-3AEA-1069-A2D8-08002B30309D} - My Computer.
{208D2C60-3AEA-1069-A2D7-08002B30309D} - My Network Places.
WARNING: Regedit has no mercy. It is very dangerious to mess around in. Note there is no Edit>Undo. If you make a mistake it could mean you'll be reinstalling your OS!
Tips : Reduce Size Of Windows Folder
There are many reasons for making your windows folder smaller, first it saves space and removes windows features you will probably never use that are just slowing down your computer.
What can you delete?
That is what this article is about, I will explain everything I know is safe to delete, and what happens if you do!
Will this really improve the speed of my system?
I don’t have any results to prove it, but I think it does improve boot time a little, and after a clean install, it does seem to make the system slightly faster after deleting these things.
Final notes: This has been tested on Windows XP Pro Final and SP1 (Not home, but it should work fine) Windows 2003 Enterprise Server 3700, RTM, and The Free Evaluation version (Any 2k3 version should work fine), and Windows 2000 Pro. If the following folders are not on your 2k/2k3 system it means they are only in XP and you don’t need to worry about them.
If for some reason you can not delete a folder, just delete the files inside, I tried to make not of the folders that cant be deleted, but depending on your system and if you use FAT32 or NTFS it may be different.
All of the paths listed in there are C:\Windows and C:\Program Files, if your folders have different names (Like C:\WINNT on windows 2k) then you should use that path instead.
Well, lets get started deleting, these start out ordered from largest to smallest, but after the first few files they are all fairly small, and are just in a random order.
1. c:\windows\system32\dllcache\
NOTE: DON’T DELETE THIS FOLDER, JUST ALL THE FILES INSIDE! This folder uses a LOT of hard drive space, it holds a backup of every system file that windows uses. Deleting this will cause a SFC error when you replace a system file instead of windows putting back the original file. For people who want to mod there system, this is a good thing.
2. c:\windows\servicepackfiles\i386\
NOTE: DON’T DELETE THIS FOLDER, JUST ALL THE FILES INSIDE! This folder only exists if you installed a service pack on XP, if you did a slipstream it won’t be here either. This folder is the same as the dllcache, but has the new files that were updated by a service pack. If you delete the dllcache, deleting this is just like finishing the job.
3. c:\windows\$Uninstall----$
These $uninstall----$ folders are used whenever you want to uninstall a windows update. If you delete them, you can not uninstall the update(s), but if the updates are working fine for you, there should be now reason to remove them.
4. c:\windows\cursors\
This folder contains some custom cursers for windows, if you are happy with the default cursers, or use your own set like Blue Curve, then deleting this wont effect you at all.
5. c:\windows\driver cache\i386\
NOTE: DON’T DELETE THIS FOLDER, JUST ALL THE FILES INSIDE! This is one you may not want to delete, this takes up a bit of space (about 80mb) but windows uses if you ever add or remove windows components and things like printer drivers. If you’re your hardware is already working fine, you don’t need this folder on your hard drive. For example, if you delete this folder, and try to install IIS, windows will ask for the CD or Network share with the files on it, if you don’t need to add or remove windows components often, deleting this will free up some space for you.
6. c:\windows\help\
NOTE: DON’T DELETE THIS FOLDER, JUST ALL THE FILES IN SIDE! This folder contains all of the windows help files. If you are like me, and think they having 50mb of help files is a waste, then you probably want to delete it. If you delete this folder and try to view a help file, the Help and Support center will come up with a 404 error. No harm is done, you just can’t view the help files (because you deleted them…). There is also a tours folder inside of the help folder, you can delete everything in this folder also, but windows won’t let you remove the actual folder.
7. c:\windows\inf\
NOTE: DON’T DELETE THIS FOLDER, JUST ALL THE FILES INSIDE! This folder contains a lot of windows drivers, if you ever add new hardware, windows looks in this folder, then on your CD drive for the latest drivers. Any hardware you might get will probably come with the drivers on a disk, so this folder is just a wasting space on your hard drive with outdated drivers. If all of your hardware is working fine, and you don’t plan on adding any new hardware for a while, deleting this wont effect your system at all. If you don’t want to delete everything in it, you can go into the folder, press CRTL+F and search for mdm*.* and delete everything that comes up. These are all modem drivers, and it is very unlikely you will ever need them because you either have a modem installed already, or if you do add one, it will come with newer drivers.
8. c:\windows\srchasst
This folder is the XP Search assistant, if you delete it, windows will just use the classic 2k style search instead, which is more functional and easier to use.
9. c:\windows\downloaded installations\
This folder holds the installers for some programs you download and install, for example, Tweak UI puts its installer in this folder, and so you can repair it or update its components later. Deleting this folder won’t harm any programs I have ever seen, but you should look inside this and see what you are deleting first.
10. c:\windows\media\
These are the default windows sounds, if you don’t want them, deleting them wont hurt anything.
11. c:\windows\system32\restore\
This is the system restore apps, if you delete this, system restore will no longer work. Before you delete this, you should go into System Restore, and delete all your restore points, and then you should go to the system properties and disable system restore. After that, you can delete this folder, and not worry about system restore slowing down your system or sucking up space.
12. c:\windows\system32\usmt\
This folder is the File and Settings Transfer wizard. If you have no need for it, then deleting this wont have any other effects besides the File and Settings Transfer wizard not working anymore.
13 A. c:\program files\msn
13 B. c:\program files\netmeeting\
These are the MSN Explorer and Net Meeting applications. If you don’t need or use them, then you can delete these folders (For net meeting, you can only delete the files inside) and the only thing it will effect is that these programs will know longer work.
14. C:\windows\system32\oobe
NOTE: DON’T DELETE THIS FOLDER, JUST ALL THE FILES INSIDE! In this folder is the Out of Box Experience (The screens you see right after you have installed XP for the first time), and the XP Product Activation stuff. If you have a Retail or OEM version of XP, and you think you might ever need to activate again, DON’T DELETE THIS. So unless you are using XP or 2k3 CORP, you may still need this folder someday.
15. c:\windows\msagent
This folder holds the MS Agent program. The MS Agent is a gay little wizard thing that looks like the Office Assistant, I personally hate this thing, and removing it will get rid of it for good! If windows wont let you remove the folder, just delete everything inside of it, and everything inside of the intl folder.
16. c:\windows\java
This is the crappy MS Java components that don’t work well, and MS got sued over. If you have Windows XP slipstreamed with SP1a you wont have this because MS no longer distributes it. If you use websites that use Java Applets, you should keep this, or remove it and install Suns Java VM.
17. c:\windows\mui
This is a little app that allows you to switch between multiple languages, if you only use one language, then deleting this wont effect you at all. NOTE: I think this folder only exists on XP Pro because Home Edition doesn’t support multiple languages.
Post Deletion:
After you have deleted everything you want to, I recommend you run the Regisrty Cleaner.This will remove all the references to things you deleted so a window doesn’t look for the files any more. If you delete the Java Folder, RegCleaner will find at least 50 reg entries related to it, and can remove them for you if you want.
What else can I do to make the windows folder smaller?
If you want to make your windows folder even smaller, and you use NTFS, you can use NTFS compression to make the windows folder smaller. Although you can compress everything it, compressing EXEs and DLL files will make you system a little bit slower, so I recommend compressing everything BUT EXE and DLL files.
Using this guide, you should easily be able to make your windows folder less then 1gb, but because some programs add there own files to the windows dir, your results may differ from what other people have gotten there folder sizes to. After a clean install, it is fairly easy to get your windows folder less then 700mb so you can put a image file of your clean install on one CD and be able to restore it easily.
Tips : Bios Ripped, useful Tips on BIOS
As you can see there are various ways on bypassing/changing BIOS passwords.
I have successfully used all of the options below on various computers many years ago. These methods will work on computers of today. I have updated the Standard BIOS backdoor passwords for current computers made as of last week. ( big grin ).
READ EVEYTHING BEFORE YOU USE ANY METHOD LISTED BELOW.
Basic BIOS password crack - works 9.9 times out of ten
This is a password hack but it clears the BIOS such that the next time you start the PC, the CMOS does not ask for any password. Now if you are able to bring the DOS prompt up, then you will be able to change the BIOS setting to the default. To clear the CMOS do the following:
Get DOS prompt and type:
DEBUG hit enter
-o 70 2e hit enter
-o 71 ff hit enter
-q hit enter
exit hit enter
Restart the computer. It works on most versions of the AWARD BIOS.
Accessing information on the hard disk
When you turn on the host machine, enter the CMOS setup menu (usually you have to press F2, or DEL, or CTRL+ALT+S during the boot sequence) and go to STANDARD CMOS SETUP, and set the channel to which you have put the hard disk as TYPE=Auto, MODE=AUTO, then SAVE & EXIT SETUP. Now you have access to the hard disk.
Standard BIOS backdoor passwords
The first, less invasive, attempt to bypass a BIOS password is to try on of these standard manufacturer's backdoor passwords:
AWARD BIOS
AWARD SW, AWARD_SW, Award SW, AWARD PW, _award, awkward, J64, j256, j262, j332, j322, 01322222, 589589, 589721, 595595, 598598, HLT, SER, SKY_FOX, aLLy, aLLY, Condo, CONCAT, TTPTHA, aPAf, HLT, KDD, ZBAAACA, ZAAADA, ZJAAADC, djonet, %шесть пpобелов%, %девять пpобелов%
AMI BIOS
AMI, A.M.I., AMI SW, AMI_SW, BIOS, PASSWORD, HEWITT RAND, Oder
Other passwords you may try (for AMI/AWARD or other BIOSes)
LKWPETER, lkwpeter, BIOSTAR, biostar, BIOSSTAR, biosstar, ALFAROME, Syxz, Wodj
Note that the key associated to "_" in the US keyboard corresponds to "?" in some European keyboards (such as Italian and German ones), so -- for example -- you should type AWARD?SW when using those keyboards. Also remember that passwords are Case Sensitive. The last two passwords in the AWARD BIOS list are in Russian.
Flashing BIOS via software
If you have access to the computer when it's turned on, you could try one of those programs that remove the password from the BIOS, by invalidating its memory.
However, it might happen you don't have one of those programs when you have access to the computer, so you'd better learn how to do manually what they do. You can reset the BIOS to its default values using the MS-DOS tool DEBUG (type DEBUG at the command prompt. You'd better do it in pure MS-DOS mode, not from a MS-DOS shell window in Windows). Once you are in the debug environment enter the following commands:
AMI/AWARD BIOS
O 70 17
O 71 17
Q
PHOENIX BIOS
O 70 FF
O 71 17
Q
GENERIC
Invalidates CMOS RAM.
Should work on all AT motherboards
(XT motherboards don't have CMOS)
O 70 2E
O 71 FF
Q
Note that the first letter is a "O" not the number "0". The numbers which follow are two bytes in hex format.
Flashing BIOS via hardware
If you can't access the computer when it's on, and the standard backdoor passwords didn't work, you'll have to flash the BIOS via hardware. Please read the important notes at the end of this section before to try any of these methods.
Using the jumpers
The canonical way to flash the BIOS via hardware is to plug, unplug, or switch a jumper on the motherboard (for "switching a jumper" I mean that you find a jumper that joins the central pin and a side pin of a group of three pins, you should then unplug the jumper and then plug it to the central pin and to the pin on the opposite side, so if the jumper is normally on position 1-2, you have to put it on position 2-3, or vice versa). This jumper is not always located near to the BIOS, but could be anywhere on the motherboard.
Sunday, August 19, 2007
Tips: Cleaning the TEMP Directory
One thing that is often overlooked, and can have a negative affect on your computer's performance,
are all the files that are in the TEMP directory. I've had quite a few people ready to get new computers until this was cleaned.
These are easy to clean and slightly different in Win9x and Windows2000 or WindowsXP
Windows98
Open up a DOS prompt
CD \windows\temp (make sure you are in that directory before running the next line.
Run deltree /y *.*
CD \windows
Run del *.tmp (be very careful of the spelling)
Windows2000 / WindowsXP
Go to C:\Documents and Settings\User_Name\Local Settings\Temp (where User_Name is replaced by the person who is logged in)
Delete all the files
Tips : Change The Start Button Name
1. Navigate to your windows or winnt directory.
2. Make a copy of explorer.exe put it somewhere safe. make another copy name it explorer1.exe, put it in the windows directory.
3. Download a version of a Hex editor on a freeware site.
4. Open up explorer1.exe in the Hex editor .
5. Search for strings named Start
6. Heres some help with the offsets:
# Windows 98
Offset: 0x00028D6E - 0x00028D76
# Windows NT4
Offset: 0x00028BEE - 0x00028BF6
# Windows ME
Offset: 0x00033DDE - 0x00033DE6
# Windows 2000
Offset: 0x0003860E - 0x00038616
# Windows XP (Enhanced Start Menu)
Offset: 0x000412B6 - 0x000412BE
# Windows XP (Classic Start Menu)
Offset: 0x0004158A - 0x00041592
# Windows XP SP1 (Enhanced Start Menu)
Offset: 0x0004208E - 0x00042096
# Windows XP SP1 (Classic Start Menu)
Offset: 0x0004259A - 0x000425A2
start will be just before this:
There was an internal error and one of the windows you were using has been closed.".
now rename start to another five letter word of your choice like Help
save the modified explorer1.exe
open up regedit, you are looking for this key:
[HKEY_LOCAL_MACHINE\SOFTWARE\Microsoft\Windows NT\CurrentVersion\Winlogon]
search for the value named Shell and make it equal to explorer1.exe.
restart for changes to take place.
alternatively, close all apps, fire up task manager and end the process explorer.exe, start new traske explorer1.exe and there you go.
if PC dont boot, slave off , navigate to your windows delete explorer1.exe and rename explorer.exe to explorer1.exe, plug back into your PC and there you go back to normal, i assure you it works great!
Tips And Tricks: PC Upgrade
Tired of your out dated personal computer configuration? Think your computer is no good anymore?
With the price of the personal computers having hit rock bottom in the past couple of years, one can't help but think of getting the latest replacement. Also, with the extensive promises that chip manufacturers, video card designers and peripheral manufacturers make these days, your computer might seem far outdated than it actually is for your needs.
However, before you jump to any conclusions, here are a few questions you need to answer first.
~ How long ago did you buy your machine?
~ What do you use your computer for?
~ Where exactly does it fall short?
Read on to understand the kind of performance an average computer user actually needs from his machine.Then evaluate if you really need an upgrade.
Hard drives
There isn't much to choosing or upgrading a hard drive. When you fall short of storage on your machine, which is sooner rather than later, just get a new 160 or 300 GB disk.
Go for companies like Seagate, Western Digital or Hitachi since they have well-established dealer networks in most Indian metros. A 300 GB, 7500 rpm hard disk should cost you between Rs 4,400 -- 4,700. Once bought, just complete the formality of partitioning it to facilitate storage of programme files.
Motherboard
Look at the right reasons before upgrading your motherboard. One of the primary reasons for the upgrade could be the fact that you want a more responsive, faster central processing unit, CPU. Perhaps your present motherboard needs a new socket, or does not adequately support the speed. In case of an upgrade, go for a motherboard with integrated sound, video, network and modem. This will free up quite a few slots to help you upgrade to perhaps a, 8X AGP adapter.
Remember that upgrading your motherboard is quite pointless unless you simultaneously upgrade your CPU and random access memory, RAM, too. Upgrading your AGP card or getting PCI Express means an additional expense on a DDR2. Once you reach the point where the only old components on your machine are the drives and the peripherals, seriously consider getting a new machine.
CPU
Let's get it clear what a CPU upgrade practically means:
* Your motherboard has to support it first, and it needs to be at least 40-50 per cent faster than your earlier CPU for you to even notice the difference.
* The memory and hard drive will be running at an unchanged speed.
* A CPU upgrade means more on-chip cache, and faster command execution.
A CPU upgrade makes a lot of sense if you manage to get a substantial upgrade in the chipset and the CPU at under Rs 3,000. Also socket compatibility and compatible chip set models are factors you should ascertain prior to upgradation.
RAM
This is the best value for your buck as far as improving performance is concerned. Anything under 256 MB surely needs an upgrade. Most softwares and applications today struggle to run smoothly on machines with 128 MB RAM, say for example running Windows XP. Upgrade over 256 MB at your own discretion in case of usage of heavy applications like graphics-heavy games, animation software or speech recognition.
It is recommended to replace your entire RAM with the new one at the time of the upgrading. Do not upgrade just the required additional RAM over your old one. It leads to complications, and quite simply for the marginal cost difference, it's not worth the trouble.
CD ROMs
Some points to remember:
* Faster CD or DVD drives do not affect any application or program that you run. So whether the player is a 16X or a really old 2X, there isn't much to gain with a faster drive.
* Choose to go for a DVD burner upgrade over a CD burner. The cost difference is negligible for the advantages.
* Check for software compatibility with the drive upgrade as that is the area of highest concern while upgrading.
* Upgrading from an existing burner to a faster burner is pointless, unless you plan to burn CDs or DVDs for commercial purposes in large quantities.
Video card
An AGP adapter or a top-end PCI Express can cost you more than your entire machine at times. Similarly, a Rs 25,000 video card in a Rs 20,000 machine will not make your machine gain much performance edge, besides bettering the 3D effect a little bit. If you are into hard-core gaming, make sure that you have an AGP slot and not onboard video before you go for an expensive video card upgrade.
Sound card
Keep a few pointers in mind:
* There is no 'ultimate' sound system. It depends whether you want your speakers to produce 3D surround effect for games or a home theater effect or rather take the place of your music system. Choosing a sound system is one of the most subjective calls you could take among all hardware choices for your computer.
* For 3D surround sound in games, first check if you have a 3D sound card installed before installing the four speakers. It is the card that actually gets you to hear enemies closing up on you from behind, not the number of speakers.
* If you are simply interested in recording music, go for a sound card with a good A/D conversion. Choose a top shelf card if you want to compose music on your machine.
* Dolby Surround Sound is the same as 3D surround, and usually most motherboards support 6 channel speakers (5.1 audio) that come with a sub-woofer.
If the cost of an upgrade exceeds Rs 15,000, don't even consider an upgrade; go for a new machine. If the cost for upgrading is between Rs 10,000 to Rs 15,000, take a call on how old your machine is. If it exceeds 3 years, you might consider buying a new one.
Don't upgrade your machine in a hurry. Understand and list your needs of a computer. Check your current system configuration and check if you are really falling short of an upgrade. Most times, upgrading your machine might not be worth it in terms of time and efforts required, since new ones cost so little.
Keep in mind that system crashes and software failures might just mean you need to clear some memory space, curb a few applications or defrag your machine; not that your machine is 'out-dated' for your needs.
Note
~ Basic hardware requirements have been addressed in the article.
~ Prices are subject to fluctuation across markets.
~ The article does not endorse any brand/ brands of hardware or computers.
Tricks : Some Windows Short Cut Keys
Some Windows Short Cut Keys
task manager shortcut --> ctrl + shift + Esc.
ctrl + shift + clicking on hyperlink - opens page in new window (works in firefox too!)
ctrl + click a file and then draging it creates a copy of that file.
Windows key + e Opens Windows Explorer
Refresh webpage - Ctrl + R
Windows key + e Opens Windows Explorer
ctrl + shift + click a file and then draging it creates a shortcut of that file.
Alt + F4 close the window currently being used
or
If no windows are open then it brings you to a shut down screen
windows key + m minimizes all windows
windows key + f open the search window
windows key + L locks your station
F9-Volume Up
F10-Volume Down
windows key + pause/break key opens up system properties.
if multiple windows are opened:
alt + tab - will show the next page under the currently viewed one
Tips : To Configure DHCP In Your PC
Dynamic Host Configuration Protocol (DHCP) is the configuration of your Internet Protocol (IP) address, subnet mask, DNS servers, domain name suffix and about 200 other possible options to let your computer communicate with a network automatically via a server or router. It sounds complicated, but once set up, it can make connecting to a network much easier.
Steps
Log into Windows XP with administrator rights. This makes setting up the network for you, and other users, easier as you can make all the necessary changes to settings.
Look for the Network Neighborhood or My Network Places icon in your desktop. If it is not there, try your Start Menu.
Right-click the Network Neighborhood/ My Network Places icon. A drop-down menu will appear.
Choose the "Properties" option, generally found at the bottom of the menu.
Look for an icon named "Local Area Connection". The icon looks like a pair of computer connected by a link. Double-click this icon.
Click the "General" tab, if it is not already selected. You will see a list of protocols to choose form.
Scroll down and choose Internet Protocol (TCP/IP), and then click the button that is labeled "Properties" .
Again, click the "General" tab, it it is not alreay selected. You will see two choices:
"Obtain an IP address Automatically"
"Use the following IP address..."
Choose option 1.
You have effectively configured DHCP for your PC. When your computer obtains the IP address, it will also obtain DNS server information automatically. This is provided by your dhcp server.
Tips
Make sure your NIC (Network Card)is working properly.
Make sure you are connected directly to a router, switch or hub.
Make sure the Link light is on. (small green light where the cable plugs into the computer)
If you are connected to a LAN, make sure that you have a router that will give addresses away, since the address will be obtained by the PC from the router.
If you have a Server on the LAN such as Windows 2000 or 2003, make sure the server is configured DHCP enabled as well.
Tips: Set Your Favourite Video As Wallpaper
Tips And Tricks to Set your favourite video as Wallpaper
Just follow the steps given below:
1.Download VLC Media Player and install it.
2.Run VLC media player,go to Settings->preferences->Interface->Main interfaces,then click on wxWidgets.Remove the tick on "Taskbar" and put a tick on "Systray icon".
3.Now go to Video->Output Modules->DirectX.On the bottom right put a tick on advanced options check box.You will now see some options.Put a tick on "Enable Wallpaper Mode ".
4.Now,select playlist and put a check or tick on "Repeat current item ".
5.Press the Save button.Now close the Vlc player and run it again(to save the settings permanently).
6.Now play any video you would like to set as Wallpaper.Right click on the video and click on "Wallpaper".The video would be set as your wallpaper!!!!
Since you have checked the option "repeat current item ",the selected video will play on continuously.It will start again when finished.VLC player will remain in your system tray.If you wish to remove the wallpaper simply close the player and you will get back your original wallpaper.
Tips : To Make Free Pc to Phone Calls Anywhere in the World
Most of us have been using voice chat in messengers for very long.It is indeed an excellent way of talking to your friends and relatives for free.But obviously the better option would be if we could make Free Pc to Phone calls.
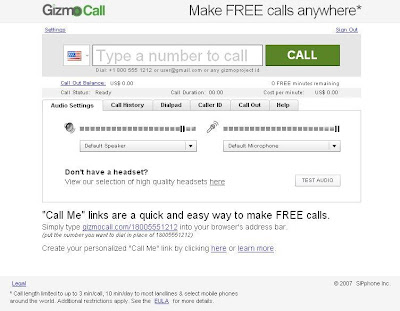
There is this site called Gizmocall where you can register for free.
After free registration you can make 10 minutes of Free Pc to phone calls anywhere in the world to most landlines and mobiles.And the nice part about it is that You get 10 minutes of Free Calling Everyday, not just once.After you register you just have to download a flash plugin and you are ready to make free calls.
But there is one restriction as well, the maximum call duration can be only 3 min/call.
The voice clarity is very good.You just need a microphone to make your calls.
Tips: To Find Who Is Invisible On Yahoo Messenger
There is this small trick that you can use to find out what the truth is.
Firstly open your yahoo messenger main window and double click on the name of the person whom you want to check.The chat window will open obviously.
Click IMVironment button, select See all IMVironments, select Yahoo! Tools or Interactive Fun, and click on Doodle.
After loading the Doodle imvironment there can be two possibilities
1.If the user is offline Doodle are will show this "waiting for your friend to load Doodle" continuously .See in the picture below:

2. If the user is online (but in invisible mode), after few seconds (it can take up to one minute, depending on your connection speed), you should get a blank page like in the picture below.So you know that the user is online.

Alternate Method:
Chose a person you want to check .Double click to open the chat window.Now simply invite the person for a voice conference.This is done by clicking on the "conference' button on the top of the chat window.
If the talk button appears and turns green then that person is online.But if you receive the message 'Voice chat could not be started ' then the person is offline.
Note:Some people use softwares like buddy spy to check who is invisible.I DONT RECOMMEND you to use such third party softwares as they can expose your Pc to hackers by sending your personal information and can even steal information from your Pc.So avoid such softwares and instead use the simple tricks given above.
If you have any queries or would like to make some useful contribution to this topic feel free to drop a line in the comments section.
Rescue Windows 98/2000/XP
Rescue Windows
With new viruses on the prowl and uncertainty about OS stability, creating a rescue startup disk for your system can prove to be a lifesaver. But how does one create a startup disk under various flavors of Windows?
Windows 98
Go to Start>Settings>Control Panel and select Add/Remove Programs. Select the startup disk tab and then press the Create disk button. When prompted for a floppy, insert one and click Ok’ This startup disk contains DOS utilities that let you scan your hard drive, copy system files, formatting your system and use the CD-ROM drive.
Windows 2000
The rescue disk here is known as ERD (Emergency Repair Disk). For creating an ERD, go to Start>Programs>Accessories>System tools>Backup. From the Tools menu, choose Create an Emergency Repair Disk option. When prompted, insert a formatted floppy disk into the drive and press the Ok button. You can also choose to backup registry files through this wizard but the registry files are saved in a folder called Repair in your system root directory instead of the floppy disk.
Windows XP
Here the rescue disk is called ASR (Automated System Recovery) disk. This disk can only be created when you take a back up of your system files. For the same, go to Start>Programs>Accessories>System tools>Backup. From the Tools menu, select the ASR wizard and take a back up of the files. You can create a disk for starting up the system in MS-DOS mode by right clicking on the floppy disk icon, selecting the format option and then checking Create a Disk to start in MS_DOS only option.
While using rescue disks, remember that if your system crashes, you will also need to have the Windows installation CD for complete recovery of your OS.
The default installation of Windows XP Prof/Home Edition starts many services in the background, which you could do without, as they eat up a significant amount of your system RAM. Depending upon your hardware, the default installation runs about 30 to 35 services in the background. If you want to optimize XP purely for gaming, then you just need to enable 7 of these services and disable the rest. In addition to this, you also need to do a few other things to optimize XP. Let’s look at them one by one.
Right click My Computer and select properties. Click on the Advanced tab, and from the performance option, click the settings button. This will open a performance window. Select the Adjust for best performance radio button and click OK.
Remove everything from the task bar, such as clock, sound, etc.
Disable all programs that automatically start when the system boots up, such as messenger, other system tools. To do this, run msconfig from Start Menu>Run. Select the Start Up tab to see which programs load during system startup. Uncheck all the check boxes here.
Difference Between A Virus, Trojan, And Worm
Basically, they all fall under the generally category of "viruses". However, there are a few distinctions.
Virus - Technically, a virus infects another file (attaches or inserts itself into it). They usually infect program files or MS Office documents. From there, it can replicate, do damage, etc. Unlike a worm, these do not function as a stand alone (except possibly to infect a given file).
Worm - This is almost identical to a "true virus", except that it lives on its own and generally doesn't infect other files (although it can replace them). Usually, these copy themselves using e-mail, networks, disks, etc. Again, these are very close to a true virus, and can do the same kind of damage.
Trojan Horse - This type of program doesn't copy itself but does do damage to your computer. These types of programs rely on people to pass them around and to run them. They do not e-mail themselves. The idea is to make the program look like it's something harmless, like a screen saver or joke, so it gets sent around.
That's the crash course on virus types. Bottom line, you don't want any of the little nastys on your computer!
Tips : To Quit Printing The Page Header And Footer In Notepad
Here's how to quit printing the page header and footer in Notepad:
1. Open Notepad.
2. Click File and select Page Setup.
3. Clear the textboxes for both Header and Footer.
4. Click OK
Tips to Give Password To The 'Guest' User Account
Windows XP contains a guest account (turned off by default in XP Pro) that has the rather unique distinction of not having a password. Not only does the account not have a password, you can't even set one. As you can see, if this account is active, it presents a slight security risk. Fortunately, there is an easy way to assign a password to the guest account:
To apply a Password to the guest account:
Using an account with administrative privileges, go to the command prompt ('start\run' then type 'cmd') and enter the following command:
'Net user guest password'
Now go to 'start\control panel\user accounts' and activate the guest account if it is not already. You will be able to assign and change its password.
101 Tricks And Tips For PC
Hardware
A well-configured PC by itself offers great performance. The key here lies in the choice of the components and their arrangement.
Choice of CPU: Because ordinary people do not know much about computers, they simply buy one that has an Intel processor. More discerning buyers get PCs with AMD processors. Benchmark tests by prominent computer magazines and websites have shown that AMD Athlon processors score over Intel Pentium processors. Unlike Intel CPUs, AMD processors natively support both 32-bit and 64-bit software. AMD processors consume less power and consequently generate less heat. Hence, they do not require huge noisy fans. AMD is also a much better consumer-friendly company. It has been contributing to the development of open standards, which results in cheaper PC components. Intel, on the contrary, had tried to impose proprietary products like the RD-RAM memory technology, which was developed by its subsidiary Rambus. The biggest argument for AMD processors is the cost. AMD CPUs are always cheaper than Intel's. Remember, it is always the consumer who ultimately pays for the advertising and marketing expenses.
Choice of Motherboard: Thanks to the HyperTransport technology developed by AMD, motherboards of their CPUs are at a level higher than than Intel motherboards. Intel motherboard still use the obsolete front-side bus (FSB) technology to provide a connection between the CPU and the RAM (memory) modules. In the AMD platform, the CPU has an integrated memory controller which directly accesses the memory modules. Hence, memory operations are not bottlenecked by the FSB. Also, motherboard chipsets for AMD processors are being made by many third-party vendors (like VIA, nVidia, and ATI) who add their own expertise and performance increments to the motherboards. Intel jealously guards the chipset market for their CPUs and hence all innovations have to come from Intel.
IDE Drives Setup: Most motherboards have to IDE connectors allowing you to connect up to four IDE devices (hard disks and CD/DVD drives). Each connector can connect to two IDE devices in a master/slave combination. If you have just two devices, say a hard disk and a CD drive, connect them separately to the two IDE connectors. If you have a CD drive and CD-RW drive, connect them both to an IDE connection with the CD writer as the master and the CD drive as the slave.
Autostart CDs: To prevent a CD from autostarting when it is inserted, hold down the Shift key until Windows Explorer recognises the disk. Use Xteq X-Setup or TweakUI to permanently disable autostart behavior for CD/DVD drives.
Power Supply and Cabinet: PC components like the CPU and the graphic card consume a lot of power. So, make sure your PC cabinet has a power supply rated at a minimum of 350W. Also, make sure the cabinet has provisions for two extra fans (one in the front and one in the back). The power supply comes with a fan, which also tries to takes some hot air off the CPU through a grill placed just above the CPU. This grill needs to properly spaced out, be big enough and ideally located to provide effective cooling. Almost all PC cabinets today support the ATX standard, which will allow software to shut the PC down. In Windows 9x/Me/2000/XP, select Enable hibernation under the Hibernate tab of the Power Options applet in Control Panel. A new Hibernate option will now be available in the Shutdown Windows menu.
COM Ports: If you use a serial mouse, then connect it to the COM1 port as this is the first port that the OS checks when it is looking for a mouse. You can connect your dialup modem to COM2.
CNR Port: This port (known as Audio Modem Riser or AMR in older motherboards) can be used to add a specially made low-cost peripheral replacement. The replacement is far cheaper than a separate sound card or modem.
Fans: If your cabinet allows it, install additional fans for extra cooling.
Dust: Remove dust regularly from the insides of your cabinet and prevent them from forming a coating over the motherboard and other parts.
Driver updates: Manufacturers of PC components release new driver updates to fix problems associated with their products. Check their websites for these releases and keep your machine updated.
BIOS
BIOS Backup: Sometimes the BIOS program on your motherboard can become corrupt and your PC will not function properly. So, you need to always keep a backup of a good version of the BIOS on a floppy disc. If something ever goes wrong with the BIOS, you can flash (overwrite) it with your backup. The software used to backup or flash the BIOS is usually available on the motherboard driver CD or on the motherboard/BIOS manufacturer's website. Refer the motherboard manual for step-by-step instructions on using the BIOS flash software.
Do not Detect Absent Devices: When a PC is started, the BOIS checks all available ports/connectors on the motherboard to identify devices attached to them. Usually, not all of these ports/connectors have devices attached to them and bootup time gets unnecessarily prolonged. For example, even if you have only one IDE drive on your PC, the BIOS will still check the other three IDE connectors. To avoid this delay, enter the BIOS Setup program and change the settings to Disabled or None for these ports/connectors. However, when you add new hardware components, make sure to change their BIOS setting to Auto so that they get properly detected.
Supervisor Password: To prevent your BIOS settings from being changed by anyone else, set a Supervisor password in the BIOS and do not set the user password.
User password: If you want to prevent access to anyone else, then set the User password.
Remote access: If you often travel with a laptop PC, you might have felt the need to connect to your desktop PC at home. All you need to remotely access your home PC is a telephone connection. In the power settings section of the BIOS, set the PC to wake up on external modem act. When you leave home, keep the modem powered on, the PC switched off, and the power line connected. Use your laptop to dial your home number. When your modem at home receives the call, the PC will switch itself on. You can then use software-based networking to retrieve files from your machine. You can also use the same principle to send faxes to your PC and make it work like a fax machine. To shut down your the desktop PC remotely, you can simply rely on OS power schemes or use a remote access software.
Boot sequence: After you have installed your OS, set your hard disk first in the boot-up sequence with the CD drive and the floppy following it in that order.
Quick Power On Self Test: Keep this enabled and save on boot-up time.
Boot Up Floppy Seek: Keep this disabled.
PCI Expansion Cards: PCI add-on cards will not work properly if there is IRQ sharing conflict. Refer the motherboard manual for an IRQ number that has been designated as for PCI IRQ Steering. Set this number as the IRQ for the devices in the BIOS setup. Many devices will happily share their IRQ with other devices. However, some devices like graphic cards and TV tuner cards have heavy performance requirements and will not work with a shared IRQ. Provide these cards with a dedicated IRQ.
Disk Partitions
Primary Partitions, Extended Partitions and Logical Partitions: A hard disk can have a maximum of only 4 partitions, which are called PRIMARY PARTITIONS. In the early days of the PC, this four-partition limit was deemed sufficient. To go beyond this limit, a special kind of primary partition called EXTENDED PARTITION was invented. A hard disk could have ONLY ONE extended partition but this particular partition could have any number of smaller partitions called LOGICAL PARTITIONS housed inside it.
Multiple OS and Partitions: Some people have more than one OS installed on their PCs. It is not possible to have more than one OS on a single partition. So, you need to dedicated a partition for each OS. It is preferrable to install Linux on a primary partition. Windows 2000/XP will work on kind of partition. Windows 95/98/Me installs in the first partition on the hard disk. Perhaps you would like to read my writeup How To Multiboot Operating Systems for more information.
My recommendation is to have three primary partitions - two ordinary primary partitions (one for Win 9x/Me and one for Linux) and one extended partition.
Partitioning tool: Windows 9x/Me supplies a partition tool called FDISK. It does not recognize partitions created by Linux installations. So, you might want to use something like Ranish Partition Manager. In Windows 2000/XP, the disk management tool in the Computer Management console will allow you to partition your hard disk.
Boot Loader: If you have multiple operating systems, you might want to use a GUI-based boot loader such as Extended Operating System Loader (XOSL).
Disk Swap
Console-based OSs like DOS have only modest memory requirements. GUI-based operating systems like Windows needs lot of memory, much larger than the RAM that is usually installed on PCs. So, they use something called virtual memory. Here, a large file on the hard disk is used in conjunction with the RAM, which greatly expands the memory available to the OS. Only the data that is required at the given moment is loaded on the RAM; the rest is cached on the swap file. Just like any other file on a disk, the swap file can also get fragmented over time and OS might seem to slow down. To prevent the swap from breaking up, you can place it on a dedicated partition (just like in Linux). Set the size of this partition at about 2.5 times the size of your installed RAM and format it. Next, you need to make sure that the OS does not reserve space on this partition for deleted files because this partition is going to have only one file - the swap file. From the Recyle Bin context menu, choose Properties » Configure drives independently. Select the partition's tab and select the Do not move files to the Recycle Bin. Remove files immediately when deleted option.
In Windows 9x/Me: Right-click on My Computer, click on Properties, choose the Performance tab, and click on Virtual Memory. Here, check the Let me specify my own virtual memory settings and chose the new partition. Set the Minimum and maximum size to something below the total size of the partition. See screenshot.
In Windows 2000/XP: Right-click on My Computer, click on Properties, click on the Advanced tab, click on Performance Options, and click on Change. Here, choose the drive where the swap currently resides and remove the settings (set them to 0) in the Initial Size and Maximum Size boxes. Now, choose your swap partition and set the initial and maximum sizes to the new partition's full capacity minus say 20 MB. See screenshot.
Use the Microsoft TweakUI utility to hide this partition so that you don't save ordinary files on it inadvertantly. If you plan to run heavy-duty applications such as Oracle Database, you may need a swap partition as big as 1.5 GB, just to run the installer. In these cases, do not create a swap partition.
If you have two hard disks, then the swap partition could be created on the first partition on the second disk, preferrably connected to the secondary IDE channel. When the OS load gets shared on two hard disks, there is a perceivable increase in performance.
Device Manager
Keyboard shortcuts: There may have been times when your mouse was not detected and you had a hard time getting around the device manager. Here are the navigation keys with Device Manager. If you are in the desktop, press the TAB key repeatedly until My Computer is selected. Then press the CONTEXT MENU key, which is between the left Ctrl key and the Windows Key. This opens up the context menu for the My Computer. Now select Properties from this menu. Now you see the System Properties window. This has several tabs, one of which is the Device Manager. Press Ctrl+TAB repeatedly to move to Device Manager. Now you see all the devices listed. Press TAB to move to them. To open up any particular device, press the RIGHT ARROW and to shrink it up press LEFT ARROW. To open up the properties of any particular device, press ALT+ENTER or the CONTEXT MENU key.
DMA: Direct Memory Access (DMA) technology enables high-speed transfers from hard disk and reduces the load on the CPU in making correct data reads and writes. Make sure this option is checked in the Disk Drive Properties. Otherwise, your disk operations will be slow.
Ports: If you have a 56 kbps modem, then set its port speed to 1,15,200. This can be done from the Communication Port Properties
Modem: Most Indian modems use American-made chipsets, they do not dial tones on Indian telephone lines. So, set the modem to blind dial by choosing the Do not wait for dial tone setting or using the modem initializing string ATX3. Refer your modem manual for the list of AT commands you can use with your modem.
Saving Memory and Increasing Speed
In Windows 9x/Me, the system cache setting is not always optimised. A software called Cacheman will do this for you. In Windows 2000/XP, try changing the I/O lock page size. To do this, you can use Xteq Systems X-Setup. Choose the appropriate setting under System » Memory.
Clear the startup programs: Startup programs get loaded along with Windows. This causes a delay before the desktop becomes active. Most of these programs do nothing but hog precious memory. See if you can use the programs' settings to prevent them loading with Windows. If that is not possible, use Mike Lin's Startup Control Panel to do that. After you install this program, you can access it from the Control Panel.
RAM: A PC might start running faster simply by adding an extra module of RAM. See if this works for you. If you think you have more than adequate ram but the PC seems sluggish, then use RamBooster to proactively free up unused RAM at regular intervals.
Task Manager: Task Manager (taskmgr.exe) in Windows 2000/XP will list of programs in memory. For detailed information, use TaskInfo. These programs are useful if you are trying to weed out unwanted programs that get loaded on to the memory.
Increasing the Performance of Individual Programs: You can increase the speed of a program, by setting the process priority of the program to either High or Realtime in Task Manager. Do not go overboard on this or your system will become unresponsive.
Active Desktop: Unless you run stock market price tickers on your desktop, deactivate Active Desktop to save memory. If you have enabled Active Desktop just to enable a GIF or JPEG file as the background, then convert the file to a BMP file and set that as the wallpaper without Active Desktop.
Plain Desktop: Remove the desktop background image and set it None. This will save some memory.
Screen Resolution: Set your screen resolution to 15 bit or 16 bit for both speed and saving memory. Set a higher level only when playing games and other such special programs that require higher resolutions.
Clean the Desktop: Remove all unwanted icons from the desktop and shortcuts from the desktop and the quick launch bar. If you have shortcuts for CD drives, windows will check for their contents every time it loads up and cause a delay before the Desktop becomes active.
Remove sound events: If you remove the desktop theme sounds, your operations will get faster. To do so, go to Control Panel » Sounds and Multimedia » Schemes and then choose No Sounds.
Windows Explorer
Keyboard and mouse shortcuts:
Open any folder and press F3. This will bring up the Find Files dialog box for that folder.
Press Start+TAB key combination just once. Now, pressing TAB repeatedly will allow you to jump between various areas of the desktop, such as the desktop proper, taskbar, system tray, quicklaunch toolbar, and Start button.
When you drag a file with the right mouse button, you will be presented with an option to move or copy the file when you drop it elsewhere.
If you drag a file from some location and hover it over a folder that is minimized on the desktop without dropping it, then that folder will spring open allowing you to drop the file there.
If you drag a shortcut and place it over the Start button without dropping it, then the Start menu will spring open and you can navigate to your special program groups and drop it there.
Sometimes, when you have many programs open and you use the Alt+TAB combination to switch to another program, it does not switch. In this situation, press the Start button twice.
Press Alt+F4, to close a program. If no program is open, then it functions like a Shutdown command.
Pressing Alt+Enter after selecting an item will bring up its properties box.
Pressing Start+Pause will bring up the System Properties of your computer.
Add Extra the Send To Menu Options: Open the SendTo folder create shortcuts to the programs and folders that you commonly use. My suggestion is to have shortcuts for the Desktop, My Documents, IrfanView, and Subhash VCDPlayer. When you use the Send To menu option on a file, it will be opened by the relevant program or copied to the relevant folder.
Adding Extra Context Menu Options: Usually, a certain file type can be opened with many programs. However, the file type's right-click menu may have option for just one or two programs. So, why not add some new options for other programs? Here is how you create a context menu option for the MP3 file type so that their files can be opened by Subhash VCDPlayer. Go to Folder Options. Click on File Types tab. From the list under Registered File Types, search for and select MP3 Format Sound. Now click on Advanced. In the Edit File Type window, click on New. In the New Action window, enter Open with Subhash VCDPlayer in the text box under Action and "C:\Program Files\Subhash VCDPlayer" "%1" (including the quotation marks) in the Application used to perform action. Here, the ampersand symbol '&' is placed before the 'S' in Subhash VCDPlayer so that 's' becomes the hot key in the context menu. Use the Edit button to modify any existing settings. Exercise caution with the choice of the program. If the program and the file type are incompatible, results can be unpredictable. See screenshot.
Resize Explorer Columns: Press Ctrl+Plus to resize columns to best fit the contents. Do not use this trick in the Temporary Internet Files folder though; super-bad news if you frequent this folder to manually pick out files.
Folder Options: Customizing the Windows Explorer is done via the Folder Options. To access this,
In Windows Me/2000: From the menu, choose Tools » Folder Options.
In Windows 9x: From the menu, choose View » Folder Options
To move between the different tabs, press the Ctrl+TAB key combination or just use the mouse.
Setting the default view: There are five types of views available
Large Icons
Small Icons
List
Details
Thumbnails
You can have the same view for all Explorer windows. Open any folder and choose the type of view that you want from the toolbar. If you were to choose the Details view, then adjust the column sizes. Then, go to Folder Options and in the View tab, click on the Like Current Folder.
Single-Click To Run Applications: Normally, to select a file you single-click and to run you double-click. You can change this to hover for select and single-click to run. Go to Folder Options. Here, in the Click items as follows section, check the Single-click to open an item and Underline items only when I point at them.
Expanding and Collapsing Folder Tree Branches: On the folder pane, you can expand a branch by pressing the * (asterisk) key. To collapse a branch, press the - (minus) key.
Customized Links Toolbar: The Links toolbar has shortcuts to several Internet sites that you will never visit. Why not replace them with shortcuts to folders or files in your hard disk or your own choice of Internet sites? Display the Favorites menu, right click on Links, and select Open. In the Links folder that opens, remove the shortcuts that Microsoft has provided and create some shortcuts to your own files and folders in your hard disk or network.
Open Links in the Same Window: When you click on a folder shortcut in the Links toolbar, a new Explorer window is opened. To open the folder in the same window, right click on the shortcut and select Open from the context menu.
Removing the Links toolbar: If you want to remove toolbar from showing up at all, then right click on the Links toolbar, and click on the Links option in the context menu.
Favorites: Rather than having links to Internet websites alone, you can also have links to folder in your disk drives or network in the Favorites menu. Just open these folders and select the Add to Favorites from the Favorites menu. Now, you do not have to dig deep into My Computer or My Network Places. Just selecting the location from the Favorites menu will take you to the folder.
Using Favorites in Other Programs: The above tip can come to good use not just in Explorer windows, but also in other programs such as Word or Excel when you want to open or save files. Just click on the Favorites icon on the left of the Open or Save As dialog boxes.
Customising the Toolbar: In Windows Me/2000/XP, you can customise the toolbar with your own choice of buttons. For this, right click on the toolbar and select Customize from the context menu.
Suggested toolbar buttons: My suggestion for buttons for the customized toolbar is
Back
Forward
Separator
Refresh
Separator
Cut
Copy
Paste
Separator
Copy To
Move To
Separator
Delete
Separator
Undo
Separator
Properties
Folder Options
Views
Separator
Up
Browsing
Opera is one of the lightest and fastest browsers available. It was also the first one to provide tabbed browsing. It has numerous customisable features and is a treat to use.
Internet Explorer (IE) has the biggest share among Internet browsers and is the most standards-compliant one. Hence, many websites prefer to work with IE and some of them will not even work with other browsers. As an unfortunate result of its popularity, IE is also a favourite target for hackers, spyware and viruses. IE then becomes a security hole in your computer. So many people have migrated to other browsers like Mozilla Firefox. Firefox has been developed to closely resemble IE and has support for tabbed browsing. But because it lacks support for ActiveX controls and VBScript, it has largely escaped many browser-based attacks. If you like Firefox, feel free to use it in place of IE but remember that Firefox by itself is not an inherently safe product. New Firefox vulnerabilities are being discovered and as the new browsers gains in popularity, it will suffer the same fate as IE.
...
You can send messages to computer running the Messenger service (Windows 2000/XP) by using the command net send
Internet Explorer
IE loads up pretty fast because parts of it is loaded by Windows.
Disable the Links toolbar to provide more space for webpages. Close the History/Search pane for the same reason.
Customize the toolbar via View » Toolbars » Customize. My suggestion for toolbar buttons includes
Back
Forward
Separator
Stop
Separator
Refresh
Media
Separator
Search
Favorites
History
Separator
Edit
Separator
Full Screen
Blank home page: Set your home page to a blank one so that it loads up faster. This is done via Tools » Internet Options » General » Use Blank. When your browser is infected with spyware, you will find that no matter how many times you set the home page, it always changes to something else. Use anti-spyware software like Ad-Aware to root out such annoyances.
Offline browsing: You do not have to be online to revisit a webpage. You can access it from the browser cache. Select Work Offline from the File menu. Open the History pane by pressing Ctrl+H or clicking the History toolbar button and select the page from the list. You check the latest version on the Net however by clicking on the Refresh toolbar button or pressing the F5 key.
Search Pane: The search pane (press F3) is a feature of Internet Explorer that allows you to use MSN Search to search the Internet. When you install the Yahoo! toolbar, it will modify IE so that Yahoo! Search is used inside their search pane. However, you are still limited to using just one search engine. So, I created a search pane tweak called Search Heaven, which will allow you to access all popular search engines plus other resources like dictionaries and thesaruses from the search pane. See a demo here.
Context Menu Extensions For IE: IE allows you to copy the address of a link with just two clicks. But to copy the address of an image on a webpage, you have make at least 5 clicks. To make things like this more easier, you can create your own context menu extensions. For this, some new keys will have to be added to the registry. These keys will refer to Javascript or VBScript functions placed in some special HTML files. For a sample, download the cmes.zip. Extract the HTM files to C:\. Extract the Install CMES.reg and double click on it. The keys will be merged into the registry. Your IE context menu will have new options - "Copy All Hyperlink Address" (default), "Copy All Image Addresses" (default), "Copy Image Address" (on images), "Set Text Size To Medium" (on selected text), "Copy HTML Code" (on selected text), "Open Frame In New Window" (default), "Highlight Text" (on selected text) and "Open Link In Same Window" (on hyperlink).
Computer Security: Some websites carry misleading ads and wrong tactics to sell computer security products. Do not download or install these software. Be careful about installing ActiveX controls. The only ActiveX controls or plugins that ordinary people can safely install are that of Macromedia Flash, Real Player, QuickTime and Windows Media Player. All others like Gator or Bonzi are likely to be spyware of some sort. Many spware products are released along with dialers, screensavers, and programs like MP3 Dancer. They are almost impossible to uninstall. Even if you run their uninstall programs, they will continue to hide in your computer without your knowledge. So, be careful about installing software.
Paranoia 1: IE's autocomplete feature may throw up some web addresses at the address bar, which you may not want others to see. So, clear the history. This is done by Internet Options » Clear History. If otherwise you want to selectively remove history items, then delete the appropriate folders inside the History folder. In Windows 9x/Me, the History folder is inside the Windows folder. In Windows 2000/XP, it will be inside the Documents and Settings\«User name»\Local Settings\ folder. A list of web addresses that you have typed in the Address bar is saved in the registry. Run regedit.exe, do a search for "TypedURLs" keys and delete any values you find on the right-side pane.
Paranoia 2: Deleting the files in the Temporary Internet Files folder can remove only part of your tracks. Cookies stored by websites usually remain in this folder with their full web address. So, that is a security violation. To remove them, choose Internet Options » Temporary Internet Folder » Delete Cookies.
Paranoia 3: There is a file named index.dat inside the the Temporary Internet Files or the Temporary Internet Files\Content.IE5 folder. This contains a list URLs you have visited. If you delete this file, Windows will automatically generate an empty index.dat. However, this file can refuse to go away easily. If this is the case, then go close all windows, start Task Manager (taskmgr.exe) and end the last remaining explorer process. Your taskbar and desktop will disapear but this is okay. Now, go to the File » New Task (Run...) menu option. Type cmd to start an MS-DOS window. Use the cd command to navigate to the folder containing the index.dat file and give the del command to delete the file. Type exit to close the command prompt window. Now, switch back to Task Manager, go the File » New Task (Run...) menu option and type explorer to get back your desktop and taksbar.
Paranoia 4: When the Autocomplete feature is enabled, all your personal information including passwords are stored on the computer, which is available for others to misuse. So, when you are done with browsing at your office or an Internet cafe, follow the above three steps and clear the saved data by choosing Internet Options » Content » AutoComplete » Clear Forms and Clear Passwords. Sometimes, the Internet Options menu option might be disabled in your office or web cafe. So, delete the HKEY_CURRENT_USER\Software\Microsoft\Internet Explorer\IntelliForms key from the registry. If you want to steal or backup passwords, export this key and import it on a different machine or installation. You will also have to copy the {username}.pwl file and cookies to the new machine/installation. Sometimes, there are ActiveX programs that sit silently recording everything. You can check them out at Internet Options » Temporary Internet Files » Settings » View Objects. This will open the Downloaded Program Files folder in the windows folder. By right-clicking the contents, you can either remove them or check out their properties.
Paranoia 5: In many Internet cafes, some people leave keylogger software installed on the PCs. These record everything that is typed on the keyboard, including your usernames and passwords. So, when you visit a Internet browsing centre, run Task Manager and kill all suspicious-looking programs you find. Some sophisticated keyloggers do not even appear in the Task Manager. To be safe, do not type the characters in the your password in the usual order. Jumble them up. Use your mouse to position the cursor so that the characters are in their proper positions. Few keyloggers are smart enough to detect mouse clicks. Try this demo. The password is "lkBg(tts)2" but we do not type it in that order.
Dialer: When you click on a link, IE starts the dialer program, which can be very annoying. So, disable this via Internet Options » Connection » Never dial a connection. When you want dial a connection, go to the Dial-Up Networking.
Savings on Telephone Bills: You can make optimum use of your online time by opening the links in new windows rather than in just a single window. Take for example your Yahoo! Inbox. Right click on each message and open new windows. By the time, you finish reading the web page in one window, all the other windows would have downloaded their messages.
Downloading Recalcitrant Files: Download managers can download files faster by using more than one connection to the download server. However, they may not be able to catch the URL of some files. In such cases, open the source code of the web page via View » Source and do a search for the download file. Usually, the full url of the file will be found here. Copy this and paste it in the download manager. Some websites prevents you from right-clicking so that you are unable to save images from their website. But you can look inside the Temporary Internet Files folder and you will find that the image has been already downloaded there. All you need to do is maka a copy.
IE Toolbars & Desktop Tickers: Add the Google Toolbar to IE. With this toolbar, you will get to the results without having to visit Google's home page first. If you have to keep in touch with the latest news, then get the Reuters Desktop Ticker. Reuters is the world's leading news provider and almost every newspaper and TV station in the world gets feeds from it. Once connected to the Net, headlines flash across the ticker and you can click on the headlines to read the news stories in a browser window.
ESCAPE: Many people do not know this. If a page is being downloaded and you want to stop it, then pressing the Escape key will do that. Also, pressing Backspace key will take you to the previous page.
Saving web pages: IE allows saving a web page in a single file along with it images and other embedded content. To do this, choose Save As from the File menu. In the Save as type, choose Web Archive, single file (*.mht). Sometimes, MHT files may not show anything even though its thumbnail does show something. If you disable Javascript, you will be able to see the saved content.
Outlook Express
Outlook Express is a free e-mail client that comes bundled with IE.
OE has a lot of GUI clutter and you can reduct this. Go to View » Layout and uncheck Contact, Outlook Bar, and View Bar in the Window Layout Properties window. This is chosen by selecting Layout from the View menu.
Customize the toolbar from Window Layout Properties. My suggestion for buttons is
Send/Recv
Separator
Create Mail
Separator
Reply
Separator
Delete
Separator
Copy To
Separator
Preview
Separator
Offline
The New Message window has a separate set of toolbar buttons. Customize this with
Send
Separator
Undo
Separator
Spelling
Separator
Attachment
Separator
Insert Signature
Separator
Offline
Messages that are already in the various folders have a different toolbar. Customize this with
Reply
Separator
Previous
Separator
Next
Separator
The columns that are viewed inside a folder can be customized via View » Columns. My suggestion for columns is
Size
Attachment
Mark for Offline
Sent
From
To
Subject
The Outbox has a different set of columns so modify that separately.
Implementing Spam Filters For POP Accounts: Create two folders in your mail client - Filtered Inbox and Spam. Create the following four Message Rules in Outlook Express (Tools » Message Rules » Mail). Use your old messages as a guide while picking the words for your filters. Check the Spam folder once in a while for any false-positives. If you find any spam among the flagged messages in the Filtered Inbox, then update the filters in the third rule with new words.
Mail Rule #1: Mail From Known Contacts
Where the From line contains 'friendname' or 'contact@emailaddress.com'
Move it to the Filtered Inbox folder
and Stop processing more rules
Mail Rule #2: Mail Not Addressed To Me
Where the To or CC line does not contain 'your@emailaddress.com'
Move it to the Spam folder
and Stop processing more rules
Mail Rule #3: Word filters on From, To, & Subject lines
Where the From line contains 'debt' or 'enlargement' or 'teens' or 'viagra'
or Where the Subject line contains 'debt' or 'enlargement' or 'teens' or 'viagra'
or Where the To line contains 'debt' or 'enlargement' or 'teens' or 'viagra'
Move it to the Spam folder
and Stop processing more rules
Mail Rule #4: Suspect Mail
For all messages
Move it to the Filtered Inbox folder
and Flag it
and Stop processing more rules
Integrating HotMAIL: You can integrate your HotMAIL account with Outlook Express. Just go about as you would do with adding a POP account. After you enter your HotMAIL address, OE will automatically identify it as a HotMAIL account and pre-fill the E-mail Server Names details. Click Next enter the userid and password. When you are done, OE will ask if you want to download folders for that account. Here, choose Yes. After the folders have been downloaded, you can use it like you would use a POP mail account except that you will not be able to use the Message Rules (available under the Tools menu) on this account.
Protecting Your E-mail Address: Junk mail seems inevitable but there are a few things you can do about it. Do not give your office e-mail address or personal POP address to any website or service. Just to make sure your contacts use your e-mail address responsibly, add the following to your e-mail signature (Tools » Options » Signatures).
E-MAIL BEST PRACTICES
When you send a joke to many contacts, put all e-mail addresses in the bcc (blind carbon copy) box. (None of the recipients will know who the other recipients were.)
If you do have to forward a joke, delete all names and e-mail addresses from the message before sending it. Respect others' privacy.
Never send a mail asking the recipient to forward it to everyone he/she knows. (Chain mail accumulate many e-mail addresses over time & spammers thank the Lord when they receive one.)
Never send virus warnings to anyone. (It may be a hoax and your contacts may end up damaging their machine or losing useful data. Making regular updates to the OS, firewall, anti-virus, anti-spyware and other software is enough.)
Never use another person's e-mail address without his/her permission on any website. (Spammers harvest e-mail addresses by providing some free service.)
Handling Bulk Mailers:
Use an e-mail address from a free e-mail provider like Hotmail or Gmail. They have better junk mail filters than you can possibly create on your own.
If you want to stay one step ahead of junk mailers, then use disposable email addresses provided by Yahoo! Mail's AddressGuard service.
If a website requires that you provide an e-mail address before you can use their services, then use temporary e-mail addresses provided by Mailinator.com.
After you add your HotMAIL account to Outlook Express, right click on individual folders and select Synchronization Settings » Headers Only. This will ensure that only the message headers are downloaded when you send/receive message. After identifying useful message, you can double-click them and have their entire content downloaded. Now, you can choose to delete other messages that you think are junk without having to download them.
It is very easy to forge the the From addresses of e-mail messages. Almost all bulk messages have forged From addresses. So, there is no point in complaining to the owners of the domain used in the From address. You need to look at the message headers (select the message, right-click, select Properties » Details) to identify the ISP used by the bulk mailer. Check the screenshot for an example. The Received: header identifies the ISP used by the spammer as rr.com (Road Runner). To complain to an ISP, you need to "abuse@" to the ISP's domain name. In this case, the e-mail address to use will be "abuse@rr.com." In your message, add a copy mail headers of the junk message you had received. Without the mail headers, the ISP will not be able to take any action on the culprit.
Archiving E-mail Messages: Your e-mail messages are kept in a message store folder. The store folder's location can be found by going to Options » Maintenance » Store Folder. Copy the location of the store folder and paste it in the address bar of Explorer. Make a backup of this folder at regular intervals. When you want to move your old messages to another PC or a different installation of Windows, simply import messages (File » Import » Microsoft Outlook Express 6 » Import mail from an OE6 store directory » Browse) from the backup of your original message folder.
Options: To change the various settings of OE, choose Options in the Tools menu. If you have a dial-up account, then under the General tab, uncheck all the check boxes. Under the Send tab, uncheck the Send messages immediately. Under the Compose tab, under Font Settings choose the Verdana 9pt font or anything else that you might fancy. Under the Signatures tab, create different signatures for different accounts or one for all accounts. If you are in India, then setting the dictionary to English (United Kingdom) in the Language section of the Spelling tab will prevent conflicts with American spelling.
Blind Carbon Copy (bcc): Not many people know how to send e-mail messages using bcc (blind carbon copy). Choose View » All headers in the New Message window.
Xteq X-Setup
Xteq X-Setup is a great utility to tweak your system. It has different settings for Win 9x/Me/NT/2000.
To create a DOS box with current folder as its default directory, go to Appearance » Explorer » Context Menu » Context Menu Options and check on Enable 'DOS Prompt here' command for directories.
To hide certain drives, go to Appearance » Explorer » Options » Hide drives. For settings on shortcuts, go to Appearance » Explorer » Shortcuts.
To set up your own customized OEM logo on the Device Manager, go to Appearance » OEM information. Set the outer portions of the BMP file to the color of the 3D object (in your color scheme) before that. See screenshot.
To speed up your modem, choose the port in Hardware » Modem » COM Port Speed.
To prevent others from changing the screensaver or background, go to Appearance » Control Panel » Other Settings » Visible Pages in 'Display'.
Miscellaneous
With faxing software, if you cannot locate the recommended initialization string for your particular modem, try fax class 1 in combination with the generic initialization string: AT&F&C1&D2&K3S7=55 If this doesn’t work, try fax class 2 in combination with the generic initialization string: AT&F&C1&D2&K4S7=55
Windows 9x/Me might sometimes throw up error message that some system file has gone corrupt. You can restore things using System File Checker from Start » Programs » Accessories » System Tools » System Information » Tools.
To show the correct speed with which your modem connects to the ISP, enter the initialization string ATW2
Of all antivirus programs, AVG Antivirus is the best and the lightest. It is better than Norton or McAfee.
Run your antivirus program's complete checkup every week. Also, defrag your hard disk every week. Use Disk Cleanup every now and then to clear your hard disk of junk files.
When Windows throws up a lot of errors and refuses to stop them even after a reinstall, a clean install of Windows is in order. This process can be done more safely and easily if your data files reside in a drive other than the one where Windows sits on. This way you don't have to do time-consuming backups. So, after the first time you install Windows, follow these steps.
Your My Documents would typically be in C:\My Documents or C:\Documents and Settings\%username%\My Documents. If you have space on drive D, why not keep your documents in it? If anything goes wrong with your C drive, your documents will be safe in the D drive. For this, right-click on your My Documents and select Properties » Move. Now, select a folder in the D drive. Now, your My Documents will be available from this folder.
Change the store folder of your Outlook Express email messages as mentioned above, to a folder in another drive.
It also helps to backup email account settings too. Select Tools » Accounts » Mail. Select the email account and click on Export. This will create a file with the extension .iaf. Whenever you want to re-create the email account, click on the Import button and select this .iaf file.
Most people format their Windows drive before doing a clean install. This is not necessary. If you have more than one OS, it will delete the boot files of the other OSs too. Just delete the Program Files folder and the Windows folder from MS-DOS or from another OS and go ahead with the install. After that is done, import your email messages from the folder you had created previously. Now, delete any files in that folder. Next, change the message store back to that folder. Also, change the My Documents back to the folder you had created earlier.
Use a download manager to manage your downloads. Second-generation download managers allow for the files to be downloaded in pieces simultaneously by more than one thread, and combine them together after download is over.
If you keep a lot of programs installed, your program menu can get very long. So, divide them into sections such as Multimedia, Internet, System Tools, Utilities, etc., by creating appropriately named folders inside the c:\windows\Start Menu\Programs folder and making appropriate choices during installation.
Quicklaunch Toolbar: Keep the Show Desktop icon in it. If you had deleted it for some reason, then do a search for *.scf in the drive and if you find the Show Desktop.scf file, copy it to the Quicklaunch folder. If you do not find it, then create a new folder. Open Notepad and type the following
[Shell]
Command=2
IconFile=explorer.exe,3
[Taskbar]
Command=ToggleDesktop
Choose Save as from the File menu. In the dialog box, change Save as type to All files. Give the filename as Show Desktop.scf. Make sure you save it in the folder you had created just then. Now, right click the taskbar and choose Toolbar»New Toolbar. Here choose the folder where you had put the Show Desktop.scf file.
Keep shortcuts in your Quicklaunch bar for your drives. Create a shortcut with the target as c:\windows\rundll32.exe user.exe,exitwindows. Clicking on this icon will shut down Windows in a snap. However, this command works for Windows 9x/Me only. For Windows NT/2000/XP, you need something more sophisticated. I suggest you download Wizmo (Windows Gizmo - 37 KB). Create shortcuts to this small program using appropriate parameters for logoff, shutdown, restart, hibernate, reboot, and several other functions.
Explore and try to find new ways of doing things.

